Pear and ginger chutney
Kindly provided by Ivy and Neat.
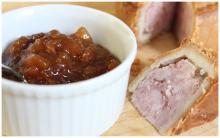
Pears are in season right now, and if you are lucky enough to have a pear tree in your garden, you might be wondering what to do with all the tasty fruit. This delicious dark chutney includes both pears and apples, as well as ginger which adds a lovely warming flavour. Try it with cheese, cold meats, pork pie, or added to a ploughman’s lunch or sandwiches. When you make it, remember to weigh the fruit after preparation rather than before.
You will need:
- 1.5kg pears, weighed after they have been cored and chopped finely (into 5mm-1cm pieces)
- 500g cooking apples, weighed after they have been peeled, cored and chopped finely
- 200-250g green or golden sultanas
- 2-3 cloves garlic, peeled and crushed
- 250ml cider vinegar
- 250ml white wine vinegar
- 2-3 tablespoons grated ginger
- 1 level teaspoon cinnamon
- 1 level teaspoon cumin
- ¼ level teaspoon mace
- ½ level teaspoon ground white pepper
- 400g Demerara sugar
Makes approx. 7-8 x 250g jars. If you want to try a smaller quantity first, the recipe is easy to reduce to half quantities.
-
Place sultanas and garlic in a heavy based pan with the prepared pears and apples on top. Add both the vinegars. Bring to the boil and simmer gently for about 10-15mins. This softens the fruit before adding sugar.
-
Add the ginger and spices and cook for another 10-15minutes. You should have some “mush” and some whole pieces to balance the chutney.
-
Add the sugar a little at a time and stir until all has dissolved. Return to the boil once totally dissolved.
-
Simmer very gently until the chutney has thickened, stirring occasionally to prevent the mixture sticking to the bottom of the pan. (Sultanas burn very quickly.) It needs at least 90 minutes cooking from this stage to develop flavours. As it nears completion, stir more frequently, but also gently and slowly. Move the spoon around the base of the pan taking care not to break the surface of the mixture as it can spit quite violently. It is ready when you can draw a spoon either across the base of the pan, or through a spoonful of mixture on a plate, and no watery liquid runs into the trail.
-
Bottle in warm sterilised jars.Use a skewer or the thin handle of a long spoon, to remove the bubbles from the jar mixture. Fill the jars to the base of the neck and add just a little more as the mixture might shrink slightly when it cools. Seal while hot. Label when cold and store in a cool dark place. Keep for a few months before opening to allow the flavours to develop. Once open, store in a refrigerator. It can be kept for 12-18 months.
With thanks to West Ealing neighbours for sharing the recipe.
www.westealingneighbours.org.uk www.westealingabundancew13.wordpress.com/about/
Diane Gill